在 iOS 开发中,视图的转场方式基本上分为三种:
- 在导航栈内推入或推出(push/pop);
- 以模态方式显示或消失(present/dismiss);
- 在标签视图控制器(UITabBarController)上切换;
我们在讨论自定义视图转场时,一般指的是前两种转场方式。 而这两种转场方式的实现逻辑基本上是一样的,区别在于模态形式可以控制目标视图的大小,并且可以看到下面的视图,比如系统的 Alert:
另外,因为在导航控制器中导航条是公用的,一个导航栈只有一个导航条,所以在自定义导航控制器的转场时,需要处理导航条。所以相对而言,模态形式要比 push/pop 简单一些。
那么本着先难后易的原则:),本文先讨论导航控制器的的转场。
优雅的处理导航条
前面提到,在 NavigationController 中,导航条只有一个,是公用的。这本身没什么问题,但是产品需求是变化的,设计师的想象也是天马行空的,他们不但要求视图转场时导航条是分开的,还有可能不同的页面导航条的颜色也不一样,作为程序员的我们也只有满足他们了。
当然有一些第三方框架会有一些“奇思妙想”来解决这个问题,比如 RTRootNavigationController 将每个 VC 包装一层 NavigationController,以此达到每个页面都有一个 navigation bar。但是我并不喜欢这样的方式,因为它把开发者习以为常的页面结构搞复杂了。
其实要达到这样的效果,我们只要解决两个问题:
1.如何在页面切换时显示两个导航条。这可以通过自定义转场动画来实现,动画时把导航条截图,就可以显示两个导航条的效果了。
2.不同的页面如何显示不一样的导航条。这一点我们可以参考系统的做法。不同的页面虽然共用一个导航条,但是却有不同的 navigation item,navigation item 里封装了该页面要展示到导航条上的内容和视图。
@interface UINavigationItem : NSObject <NSCoding>

@property(nullable, nonatomic,copy)   NSString        *title;
@property(nullable, nonatomic,strong) UIView          *titleView;
@property(nullable, nonatomic,strong) UIBarButtonItem *leftBarButtonItem;
@property(nullable, nonatomic,strong) UIBarButtonItem *rightBarButtonItem;

@end
我们可以仿照系统的方法,给 navigation item 添加一个 view,用来显示不同的颜色、添加自定义内容。
@interface UINavigationItem (STMTransition)

@property (nonatomic, strong) UIView *stm_barTintView;

@end
优雅的处理返回手势
这一点已经有比较好的方案了:FDFullscreenPopGesture,本文不再赘述。
开始自定义转场动画
解决了上面两个问题,我们就可以开始自定义我们的转场动画了。
苹果提供的转场动画方式都是通过协议提供的。要实现导航控制器的转场,第一步就是遵守 UINavigationControllerDelegate 这个协议。其中跟转场相关的有两个:
- (nullable id <UIViewControllerInteractiveTransitioning>)navigationController:(UINavigationController *)navigationController
                          interactionControllerForAnimationController:(id <UIViewControllerAnimatedTransitioning>) animationController NS_AVAILABLE_IOS(7_0);

- (nullable id <UIViewControllerAnimatedTransitioning>)navigationController:(UINavigationController *)navigationController
                                   animationControllerForOperation:(UINavigationControllerOperation)operation
                                                fromViewController:(UIViewController *)fromVC
                                                  toViewController:(UIViewController *)toVC  NS_AVAILABLE_IOS(7_0);
-(id<UIViewControllerAnimatedTransitioning>)navigationController:animationControllerForOperation:fromViewController:toViewController: 会返回一个遵守 UIViewControllerAnimatedTransitioning 协议的一个对象,navigation controller 会将转场过程代理给该对象。
UIViewControllerAnimatedTransitioning 协议主要的方法有两个:
- (NSTimeInterval)transitionDuration:(nullable id <UIViewControllerContextTransitioning>)transitionContext;
- (void)animateTransition:(id <UIViewControllerContextTransitioning>)transitionContext;
一个返回动画时间,一个执行动画。
具体实施时,可以采用继承的方式,生成一个 UINavigationController 的子类,并实现代理。但是这种方式不太灵活,且侵入性强,所以本文还是采用 runtime 的方法。具体的做法是这样的:
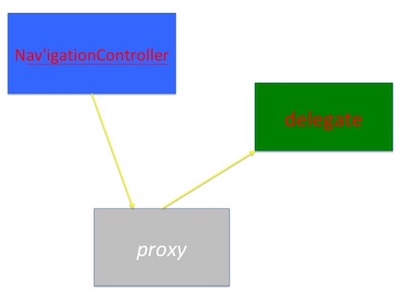
hook 住 navigation controller 的 delegate,在 navigation controller 和它真实的 delegate 之间添加一个代理类 STMTransitionProxy,专门用来实现转场代理。
- (void)stm_setDelegate:(id<UINavigationControllerDelegate>)delegate {
  self.proxy.delegate = delegate;
  [self stm_setDelegate:self.proxy];
}

- (id<UINavigationControllerDelegate>)stm_delegate {
  return self.proxy.delegate;
}

- (STMTransitionProxy *)proxy {
  STMTransitionProxy *proxy = objc_getAssociatedObject(self, @selector(proxy));
  if (!proxy) {
    proxy = [[STMTransitionProxy alloc] init];
    proxy.navigationController = self;
    self.proxy = proxy;
  }
  return proxy;
}

- (void)setProxy:(STMTransitionProxy *)proxy {
  objc_setAssociatedObject(self, @selector(proxy), proxy, OBJC_ASSOCIATION_RETAIN);
}

......

@implementation STMTransitionProxy

......

- (id<UIViewControllerInteractiveTransitioning>)navigationController:(UINavigationController *)navigationController
                         interactionControllerForAnimationController:(id<UIViewControllerAnimatedTransitioning>)animationController {
  if ([self.delegate respondsToSelector:_cmd]) {
    return [self.delegate navigationController:navigationController interactionControllerForAnimationController:animationController];
  }
  return self.interacting ? self.interactionController : nil;
}

- (id<UIViewControllerAnimatedTransitioning>)navigationController:(UINavigationController *)navigationController
                                  animationControllerForOperation:(UINavigationControllerOperation)operation
                                               fromViewController:(UIViewController *)fromVC
                                                 toViewController:(UIViewController *)toVC {
  if ([self.delegate respondsToSelector:_cmd]) {
    id<UIViewControllerAnimatedTransitioning> animator = [self.delegate navigationController:navigationController
                                                             animationControllerForOperation:operation
                                                                          fromViewController:fromVC
                                                                            toViewController:toVC];

    return animator;
  }

  ......

}
至此,导航控制器的转场动画的流程就完成了。下一篇我们再讨论模态转场。
文章写得比较简单,疏漏之处请多包涵。本文DEMO